Author Archive: Alicia Hamilton

Everyday Seasoning Mix

My husband and I love making pre-made seasonings. It is nice to go into the cabinet and pick out one shaker and not have to go searching for much else. We made this blend of seasonings as a basic spice blend. We use it on just about everything like chicken, potatoes, and veggies. So in our house we started calling it “everyday seasoning” for just that reason. I like this seasoning because it is basic enough for a variety of dishes but it gives a slightly smoky, almost barbecue flavor.

Just as a note, we usually buy our spices from the bulk section in our grocery store- mostly we go to Whole Foods for this. We find the spices are fresher and are less expensive than buying an entire bottle in the spice section.


Everyday seasoning mix


Everyday seasoning

1 Tablespoon Garlic powder
1 Tablespoon onion powder
1 Tablespoon parsley flakes
1 Tablespoon smoked Paprika
1 1/2 teaspoons kosher salt
1 teaspoon Dried mustard powder
1 teaspoon celery salt
¼ teaspoon cayenne pepper
Pepper to taste

Mix all the seasonings together and place in an airtight jar. Then sprinkle it on everything!

Basic Marinara

I’ve found a few whole 30 compliant marinara sauces at the store and use them occasionally when I am in a hurry to make a meal. One really has to study the ingredients on the jar because a ton of them are full of added sugar. If I have time, or have meal plan then l I try to make my own sauce. Here is the basic recipe I have been making.

IMG_0986

Marinara

Ingredients:
2 Tablespoons olive oil
3 large cloves garlic – minced
1/3 cup balsamic vinegar
2- 28 ounce cans crushed tomatoes
1 teaspoon kosher salt
1 teaspoon dried oregano
6-8 large fresh basil leaves cut into a chiffonade

Kitchen equipment needed:
1 large sauce pan
1 large splatter guard
Wooden spoon for stirring

  1. Heat the sauce pan over medium-heat. Add the olive oil and once warmed add in the minced garlic. Sautee the garlic for about a minute. You want the garlic to soften but not really browned.
  2. Add the vinegar around to coat the garlic and scrape off any bits that have stuck to the pan. Continue to cook the simmer the vinegar until it is mostly thickened and reduced by at least half.
  3. Add in the crushed tomatoes, kosher salt, and oregano and stir well. Reduce the heat to medium-low and cover then pan with the splatter guard.
  4. Simmer the sauce for 45 minutes stirring occasionally. The sauce will be thickened and the volume of the sauce will be reduced quite a bit.
  5. Once sauce is at the desired consistency stir in the basil leaves. Adjust the salt if necessary.


I’ve used this basic marinara on top of spaghetti squash, zoodles, chicken pieces, or Italian sausages. It’s simple and versatile. Many times I add a variety of vegetables to the finished marinara before serving to make it a bit heartier.  Here I added some spinach, kale, mushrooms, and onions.

IMG_1519


Peeling Lots of Garlic Quickly & Easily

I cook with a fair amount of garlic. Sometimes I find that the peels are difficult to get off of very small or very large cloves. I came up with this quick way to take the peels off of the garlic with minimal work.

All you need to do is put individual cloves into a mason jar with a lid and shake well for a little while. That’s it. Perfectly peeled garlic cloves. If the cloves are small or have particularly tough skins, you may need to shake it a bit move vigorously.


IMG_0921IMG_0926

IMG_0922IMG_0923

Vietnamese Shaking Beef Salad

Vietnamese Shaking Beef Salad

This is definitely one of my favorite Vietnamese dishes. I have fond memories of my dad making this for dinner. In his version the beef was marinated in a sauce that contained lots of soy and sugary ingredients. My version utilizes dates for sweetness and is whole 30 and paleo friendly. The flavors are simple and delicious and just as good as I remember them.

This recipe will feed 4-6 people depending on their appetites. If you are cooking for yourself or just two people I suggest cooking just enough beef for that single meal then cooking fresh beef when you want to have leftovers. Nothing beats freshly seared beef! I’ve always served this meal on a large platter or bowl but you could arrange individual plates for yourself, family, or guests.


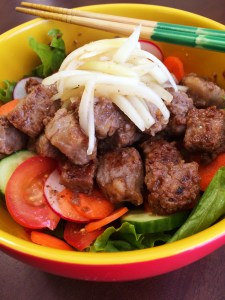
Whole 30 Vietnamese Shaking Beef Salad (Bo Luc Lac)

Ingredients:

1.5 pounds of sirloin cut into ½ inch chunks
1 Tablespoon coconut oil

Marinate:
2 Tablespoons date paste
1 Tablespoon coconut aminos
1 Tablespoon sesame oil
2 cloves crushed garlic
¼ cup water

Marinated onions:
½ yellow onion thinly sliced
¼ cup rice vinegar
1.5 Tablespoon date paste
2 Tablespoon water
¼ teaspoon water
Pepper

Salad ingredients:
Lettuce- I used green leaf lettuce but you can use other lettuce or greens like Bibb or arugula
1 tomato cut in half and sliced
½ English cucumber sliced
3-4 radishes cut into thin slices
1 large carrot cut into thin slices

IMG_1461

Dipping sauce:
Lime juice from 1 large lime
1 teaspoon salt or more to taste
A few grinds of black pepper

Kitchen equipment needed:
Measuring spoons
Containers with lids for marinating onions and beef
Wok or large pan for sautéing beef
a small bowl for the dipping sauce

  1. Start by preparing the marinades for the beef and onions. Combine all ingredients in marinades well and make sure the beef and onions are coated in the sauces. Marinate each the beef and onions for 1-2 hours or overnight.
  2. Prepare the salad ingredients as listed above. Layer the ingredients on the bottom of a large bowl or platter with the lettuce at the bottom.
  3. Make the dipping sauce and set aside.
  4. Heat the Wok or pan over medium-high heat (but closer to high than medium). Melt the coconut oil in the pan and once the pan is hot add the beef and sauté for 3-4 minutes until browned on the outside and cooked to desired doneness on the inside. Depending on the size of your pan you will probably have to cook the beef in smaller batches.
  5. Transfer the beef on top of the salad and top with the marinated onions.
  6. Dip chunks of the beef in the dipping sauce and eat with the salad. If desired you may drizzle some of the onion marinade onto the salad for some added dressing.

 IMG_1460

You can really make this any time of the year. It’s very nice for warmer weather though because besides the beef, nothing else is cooked. I hope you all enjoy this one. I have a feeling that once it starts getting hot this summer that I’m going to be making this much more often.

Perfectly Boiled Eggs

IMG_1509

There are tons of methods out there for making boiled eggs- they are mostly addressing the problem people have with the eggs not peeling well. Some say you need older eggs, some say you need to add the eggs to cold water than bring it all to a boil, some methods are steamed, or even baked. I’ve been making eggs this way for a while now and haven’t had any trouble with peeling them. I’ve used old eggs and new eggs and I have done it with brown eggs too. You know where this is leading- I’m going to tell you how I make my eggs easily peel-able and cooked to perfection. I also experimented a little with the length of time cooked to get the type of egg you want. Just as a note if you use brown eggs some of the color from the shell may peel off. It must have something to do with the vinegar in the water but I haven’t found a definitive answer on why this happens.

So here is what you need:

Small sauce pan with lid
2-3 Tablespoons of white vinegar
A spoon
Bowl of ice water

Put the pan of water on the stove and bring to a boil. Add the vinegar. Once the water is at a rolling boil lower the eggs into the pot with the spoon. Cover the pot with the lid then turn the burner off.

IMG_1511

For soft boiled eggs with a nice runny yolk, cook for 4 minutes.

For a medium, more set slightly runny yolk, cook for 7 minutes.

IMG_1516

For a boiled egg with a creamy yolk, cook 10 minutes.

IMG_1517

For a firmly cooked yolk, cook for 13 minutes.

IMG_1518

Once you’ve reached the time to get the type of egg you want, transfer eggs into the bowl of ice water. Once cooled, peel and enjoy as desired.


IMG_1514


Mediterranean Chicken Thighs and Eggplant Salad

I had a lot of extra olives so I wanted to come up with a way to incorporate them into something besides just putting them on top of a salad.  I’m a huge fan of cooking chicken this way- sautéing it in some brothy goodness until it is tender. It’s not a lot of work and the chicken doesn’t dry out either. I came up with the eggplant salad to go along with the Mediterranean theme. I’m very pleased with both of these recipes and my husband was a huge fan too.

Mediterranean chicken thighs

Mediterranean Chicken Thighs

Ingredients:
4 chicken thighs- bone in & skin on
1 Tablespoon ghee
1 can whole tomatoes with juice- each tomato cut into 4 chunks
½ cup compliant chicken or vegetable broth
½ onion thinly sliced
2 cloves garlic- minced
1 Tablespoon lemon juice
1 bay leaf
½ teaspoon dried parsley
½ teaspoon dried thyme
½ cup pitted olives of choice each cut lengthwise- I used green olives from Trader Joe’s
Salt and pepper to taste

Kitchen equipment needed:
1 large skillet with lid

  1. Heat skillet over medium-high heat and add in ghee to melt
  2. Season the chicken thighs on each side with salt and pepper. Brown the chicken on each side approximately 3-4 minutes or until lightly browned. Removed chicken from the pan.
  3. Add in the sliced onion and sauté 3 minutes. Add in garlic and sauté an additional minute.
  4. Add in the tomatoes, broth, lemon juice, parsley, thyme, and bay leaf. Add chicken back into pan, cover, and simmer on medium heat for 20 minutes.
  5. Remove the lid, stir in olives and turn heat up to medium-high. Simmer approximately 10-15 minutes longer or until the chicken is fully cooked (internal temperature reaches 165 degrees F) and sauce has thickened.

Eggplant salad

Roasted eggplant salad
1 large eggplant
2 cloves of garlic- minced
1 Tablespoons olive oil
Salt and pepper to taste
Chili powder- just a dash

Dressing:
1 Tablespoon tahini
1 Tablespoon lemon juice
2 Tablespoons olive oil
½ teaspoon dried mint

Kitchen equipment needed:
Baking sheet
Parchment paper

  1. Preheat the oven to 400 degrees F. Line the baking sheet with parchment paper. Wash and trim the eggplant. Cut the eggplant into bite sized cubes.
  2. Mix the eggplant cubes with olive oil, garlic, salt, pepper, & chili powder.
  3. Roast the eggplant in the preheated oven for 35-40 minutes.
  4. While the eggplant is roasting, mix the ingredients for the dressing and set aside until the eggplant is finished roasting.
  5. Cool the eggplant slightly then toss the eggplant in the dressing. Serve slightly warmed or cold as desired.

Mediterranean Chicken Thighs and Eggplant Salad

Try out these recipes and let me know what you think in the comments section below.

My 60 Day Results

Sorry I’m a little late putting this up. February was difficult for me. I’m not sure why, maybe it was the weather, but I was definitely in a funk. I did not make my goal of drinking a gallon of water per day. I did not go to the gym as frequently. And I did not complete “meatless Monday’s”. Basically, besides eating whole 30 complaint foods, I didn’t reach any of my other goals. T

I went out of town the last weekend in February until the 2nd of March. Traveling and eating compliant was difficult. I’m so used to having the items that I prepared ready and waiting for me when it’s time to eat. With all that being said, here are my February Whole 30 results. The right side is from day 30 and the left side is from day 60.

IMG_1441 IMG_1442

Total weight lost: 5.8 lbs

Total inches lost: 4 inches from all areas combined.

I feel like when I look at the pictures I cannot really tell a difference between the two. Again, the angles and lighting between photos are different. I think it is hard to see much change in yourself. I know that when I look at pictures of myself I notice all the things I wish I could change. I should say that even though I didn’t see changes in myself, people did comment that I looked like I had lost weight.

We are already 7 days into March and so far I’m already feeling a bit better about my Whole 100. May the February slump be over!  I’ve been thinking that I’m going to extend it to Whole 120- but let’s just wait until I see what happens. I’ve been trying my hardest to give up the scale. I know that the changes on the scale are not what I need to focus on. With all this being said here are my March goals: I want to go to the gym at least 3 times a week at minimum, I want to drink 96 ounces of water per day, and I want to limit my weight taking to only one time a week and I’d want my running hiatus to be over!


Slow Cooker Carnitas

Carnitas is by far one of my favorite meats to get at a Mexican restaurant. Since being on Whole 30, it is difficult for me to eat out because of the hidden non-complaint items at most restaurants. My solution, of course, is to just cook at home. Here is how I make mine.


IMG_1244


Slow-cooker Carnitas

Ingredients:
4 pounds pork shoulder
1 teaspoon kosher salt
1 teaspoon garlic powder
1 teaspoon ground cumin
½ teaspoon dried oregano
½ teaspoon ground coriander
¼ teaspoon ground cinnamon
2 Bay leaves
2 cups of chicken broth

Kitchen equipment needed:
Slow cooker
Measuring spoons
Small bowl

  1. Trim excess fat off the pork shoulder.
  2. Place Bay leaves at the bottom of the slow cooker and place pork on top of them.
  3. Mix the remainder of the dry ingredients in a small bowl then rub all over the top and sides of the pork shoulder.
  4. Pour the chicken broth around the pork, trying to not rinse off the dry rub.
  5. Cook the carnitas on low for 8-10 hours or until meat shreds naturally.


I love this recipe because, like most slow cooker recipes, it is quick to put together and it makes your house smell delicious. Plus, it’s one of those things that you can throw together in the morning before work and come home to and enjoy when the day is over. Once you make a batch you can use it in a variety of ways. I’ve eaten it over cauliflower rice, in lettuce boats, or on top of sweet potatoes and eggs. One of my personal favorite ways to eat carnitas is to pair it with tostones (fried plantains), guacamole, and salsa. In my opinion these additional recipes make the ultimate delicious meal.


Braised, Bone-in Pork Country Style Ribs

Braised country style pork ribs


Braising is a new love for me but I’ve really been enjoying it, especially in this colder weather. It doesn’t take much time to put everything together and it makes your house smell amazing. Plus, whatever you are braising comes out tender and flavorful. Recently, I found some good quality country style pork ribs and came up with this delicious recipe.

 Braised, Bone-in Pork Country Style Ribs

Ingredients:
¼ cup balsamic vinegar
2 cups vegetable stock
1 cup water
1 medium yellow onion- diced
2 shallots- minced
3 carrots- peeled and cut into a small dice
1 stalk of celery- diced
1 bay leaf
2 teaspoons ghee
Kosher salt and pepper to taste

Kitchen equipment need:
3.5 quart enamel coated Dutch oven with lid- I have this one and love it.
Stick blender or blender- to make gravy

  1. Preheat the oven to 350 degrees F.
  2. Rinse and pat dry the ribs. Cut the ribs into equal sized pieces that will fit the length of the Dutch oven. Sprinkle each piece with some kosher salt and pepper.
  3. Heat the tallow in the Dutch oven on the stove at medium-high heat. In batches, as to not over crowd the pan, brown the ribs for 30-45 on each side until slightly browned. Remove ribs from pan and set aside for later.
  4. Reduce the heat of the pan to medium. Using the grease already in the pan add onions, shallot, carrot, celery, & bay leaf. Cook the vegetables for 5-7 minutes until translucent but not quite browned.
  5. Add in the balsamic vinegar to deglaze the pan by scraping down the sides and bottom of the pan. Continue to cook the vegetables and vinegar until the vinegar is reduced to ½ the original amount- about 3-4 minutes.
  6. Add the ribs back into the pot and mix everything well to coat the meat.
  7. Add the stock and water into the pan. The liquid should come just to the top of the meat in the pan.
  8. Place the lid on the Dutch oven and place into the preheated oven. Cook the ribs for approximately 3 hours.
  9. After three hours remove the lid from the Dutch oven and turn the oven up to 375 degrees and brown the meat slightly- about 15 minutes.
  10. Cool the ribs slightly. Remove the meat from the pan. Transfer the vegetables, leaving a good amount of the liquid in the pan, into a blender or a container for blending with a stick blender. Blend the vegetables well until there is a thick gravy.  If the gravy is too thick, add more of the cooking liquid into the gravy to get the desired consistency you would like.

Pork ribs          mirepoix

deglazing                  Braised pork ribs 3

I served my ribs with gravy and some simple mashed potatoes. It’s a filling and delicious way to keep warm this winter.

 Braised country style pork ribs

Whole 30/Paleo Butter Chicken

There is not much to say about butter chicken except for it is amazing! For this recipe I took a more traditional butter chicken recipe and then I adjusted everything to fit with Whole 30. I found the original recipe by doing a Google search and came up with this one.


Paleo/ Whole 30 Butter Chicken

Whole 30 Compliant Butter Chicken

Ingredients:
4 chicken thighs – about 1.5 pounds
1 15 ounce can of whole tomatoes with juice- pureed into sauce
2 Tablespoons tomato paste
2 Tablespoons ghee
6 pods of green cardamom
1 pod black cardamom
1 cinnamon stick
4 whole cloves
1 teaspoon fenugreek seeds
1 dried chili
5 cloves of garlic-grated into a paste (use 1/3 of paste in marinade)
1 inch piece of ginger- grated into a paste (use 1/3 of paste in marinade)
1/3 cup raw cashews
2 cups water
1 teaspoon garam masala
½ cup coconut cream
½ teaspoon salt
Marinade:
1/3 cup coconut cream
½ teaspoon salt
1 teaspoon garam masala
1/3 of each garlic and ginger paste- see above

Garnish-optional
Cilantro
Coconut cream

Kitchen equipment needed:
Large sauce pan or Dutch oven
Container with lid for marinating chicken
Measuring spoons
Baking pan with wire rack
Foil
Meat thermometer

  1. Mix all marinade ingredients together and pour over chicken thighs. Mix thighs with the marinade to coat well then marinade overnight.
  2. The next day: line the baking sheet with foil. Place baking rack in center. Place chicken on the rack evenly spacing them out evenly. Turn oven to broil and broil the chicken thighs 10-12 minutes each side until they are slightly browned but not fully cooked. Place chicken to the side then start the butter sauce.
  3. Heat the ghee in the bottom of the pot over medium-high heat. Add cardamom, cinnamon, & cloves and fry for 1 minute.
  4. Add fenugreek, chili pepper, remaining garlic & ginger paste and sauté until slightly browned.
  5. Add pureed tomatoes and tomato paste and cook until mixture cooks down into a paste like consistency.
  6. Blend the cashews and water until they are a smooth paste. Add it to the tomato mixture and stir well.
  7. Cut the chicken into bite sized chunks and add into the tomato sauce with ½ teaspoon salt, ½ cup coconut cream, & 1 teaspoon garam masala.
  8. Cook on medium heat for 8-10 minutes or until the chicken is fully cooked and meat thermometer reads 165 degrees F.

butter chicken marinade                         butter chicken spices

butter chicken tomato sauce                            butter chicken sauce

I made this for some dinner guests and they absolutely loved it. I served it with garam masala green beans and cauliflower rice. I found the recipe for the green beans here at Food.com and check out my recipe for cauliflower rice here.